Sometimes it is important to learn how to disable USB ports to protect them from harmful substances and people, as you may have to share your laptop or computer with someone, which can be dangerous. If you insert a malicious tool into the system, the data files in the system may become damaged. To avoid such vulnerabilities, we have discussed various ways to enable/disable the USB port on the system. We were also able to recover lost data from external devices like USB drives, SD cards, etc.
Why do I Need to Disable My USB Port or Drive?
- Protect Sensitive Data from Unauthorized Access by Employees: When USB devices and other portable devices are used unattended on a network, data can be stolen or infected with harmful viruses. Organizations sometimes overlook the threat that USB flash drives can pose: One USB device can bring down an entire network.
- Unlike other online Services, A disgruntled employee could exploit this vulnerability to infect malicious devices on the system and steal critical confidential information.
- Rogue devices can harm your organization.
- Rogue Devices Can Harm Your Organization: Unidentified USB devices can wreak havoc on your network. This is because an organization’s database contains sensitive information about employees and other parts of the organization. To save all this sensitive information and data, organizations must take precautions and disable such unauthorized USB drives.
- Data Loss: The above issues can be resolved by monitoring USB devices within your organization. Organizations can protect their data by disabling these rogue devices. Using USB enable/disable
- You can also utilize third-party software tools and applications, such as the SysTools USB Data Blocker tool, to enable or disable USB ports or drives on your system.
Causes for Data Loss
Data files saved on a USB flash drive can be lost for several reasons.
- Data may be accidentally lost due to deletion or loss of data contained in the device.
- One possible reason is that you formatted the USB device without creating a backup copy.
- USB devices can become damaged or corrupted, resulting in data loss.
- If you accidentally insert or remove a USB device from your computer, you may lose data.
- USB devices can be infected with viruses.
Enable or Disable USB Ports on a Windows 11, 10 with Recommended Software
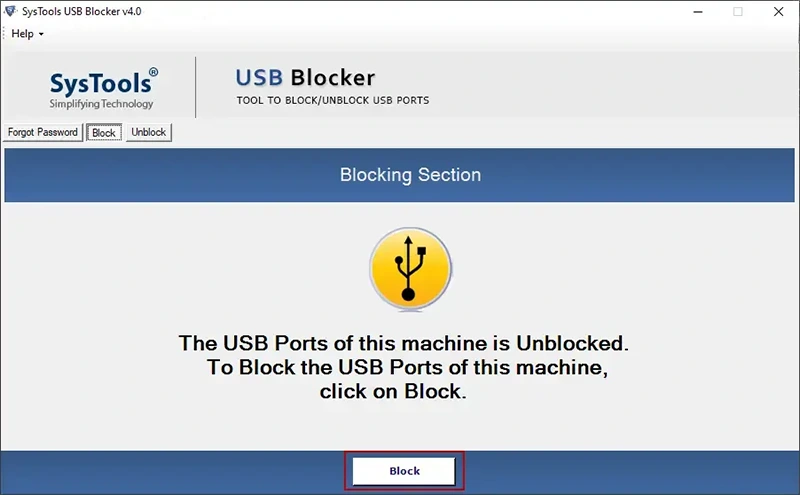
If you don’t want to use the manual method of disabling the USB port, you can try to lock or unlock the USB port with a password using a SysTools USB Port Locker Tool. This provides an extra layer of security because no one will be able to access your USB drive without your permission or password. This will protect you from the risk of data theft. However, you can unlock the USB ports at any time.
The tool is powerful and effective, as it can block or unblock an unlimited number of USB ports on various computers, laptops, etc. in one go. You need to download and install the software for free to disable and enable the USB port on each computer or laptop and disable or enable the ports as needed.
Just a Few Easy Steps to Enable or Disable USB Ports
- Download the application on your Windows system.
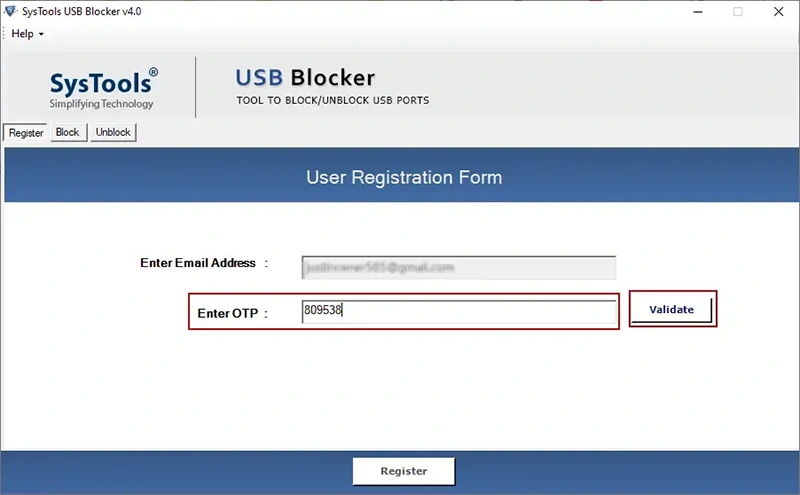
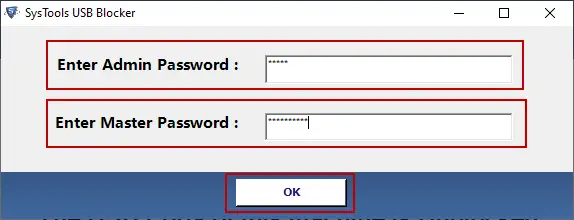
- Enter the password to lock or unlock the USB on the system.
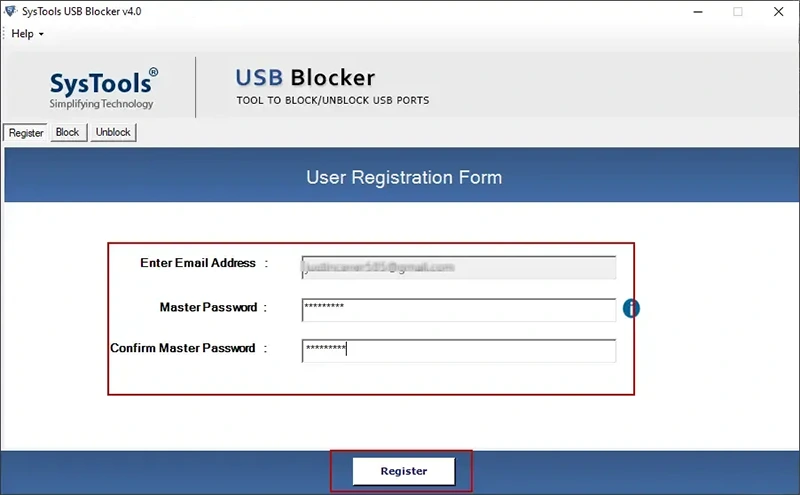
- Click the “Block or Unblock” button to begin the USB process.
- If you want to unlock the USB port, Enter the password.
Manual Methods to Enable or Disable USB Ports on a Windows PC
Administrators can disable USB ports on Windows PC in several ways. Apart from disabling USB, we have also explained how to enable admin-blocked USB ports in Windows 11 and 10.
Enable and Disable USB Ports with the Command
One of the most effective ways to disable USB ports in Windows 7, 8, 10, or 11 is to use the command line. The following steps will help you disable or enable USB ports in Windows using the Command Prompt.
- Launch Command Prompt as Administrator from the Windows Search box.
- Then, Write the command set devmgr_show_nonpresent_devices=1” and click the Enter.
- Then type start devmgmt.msc and press Enter.
- In Device Your Manager, Universal Serial Bus Controllers have been expanded.
- Then right-click on all devices and select Disconnect Device.
To re-enable USB ports in Windows 7, 8, 10 and 11, you don’t need to do anything special. To do this, follow the same process, and at the end, instead of selecting the “Disconnect device” option, select “Activate device”.
Blocking USB ports using Group Policy in Windows 10
This method is especially suitable if you are using Windows 10 Pro. You can block USB ports in Windows 10 using Group Policy. However, the Group Policy Editor is only available on Windows 10 Pro. Therefore, we recommend that users of other versions of Windows try some of the other methods described in this article.
- Use the Windows key + R to launch the Run command.
- Then enter “gpedit.msc” and click OK.
- Continue to the next route.
- Computer PC Configuration > Administrative [Admin] Templates > System > Removable Storage Access
- Next, double-click Removable Disk on the right side of the Window. No-Write Policy.
- Then click “Enable” in the upper left corner of the window.
- Select Application.
- Then click OK to finish.
- Exit the Group Policy Editor.
- Finally, restart your computer for all Group Policy Editor changes to take effect.
However, if you want to enable USB blocking in the Group Policy Editor in Windows 10 or 11, you need to follow the same steps. However, instead of enabled, you must select disabled.
Enabling or Disabling USB Ports via the Registry Editor
Administrators can also disable USB ports using the Windows Registry Editor. These are all the important steps you need to follow to block USB ports using the Registry Editor.
- Launch the Windows Registry Editor. If you are not familiar with Windows keyboard shortcuts, you can use the search box to open them.
Follow the path below.
HKEY_LOCAL_MACHINE\SYSTEM\CurrentControlSet\Services\USBSTOR
- Find “Start” and right–click on it.
- Select Edit.
- Change or Edit the data value to 4 and then click OK. This will disable the USB port.
- However, if you want to enable administrator–blocked USB ports in Windows 10, you can do so by changing the data value to 3.
Read More: How to Fix External Hard Drive Not Showing Up Windows 10?
Conclusion
We hope you now know how to enable or disable USB ports on a windows 11, 8, 0, 8, or 7 device. For more information about technology updates and device drivers visit our link.
Also Read: Can You Recover Files After Formatting External Hard Drive?